The Phone VOB will allow a team member or manager to request benefit verification from the client's chart. This process requires a completed assessment of the client's benefits that have been approved by a manager.
Important: In order to utilize the VOB 2.0 application, users must enable the VOB 2 Enabled configuration. For guidance on how to enable a tenant configuration, please click here.
Phone VOB Request
Note: Superusers must create a VOB team within the Manage Team area to designate all staff as managers.
- Navigate to the Patient Record then select Insurance List.
- Click on the Action Menu and select Phone VOB from the list.
-
Once the Phone VOB has been selected, a toaster notification will pop up informing you that the VOB has been queued.
Phone VOB Focus Panel
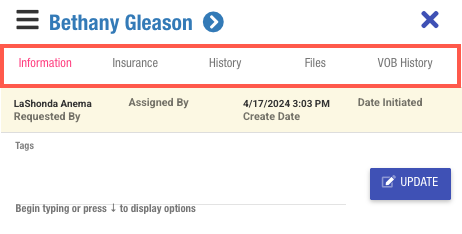
| Information | Displays the action options that users can perform related to the Phone VOB request. This tab displays items like Assigned To, Status, Notes, and Add Assessment options. |
|
Insurance |
This tab displays the insurance information associated with the phone VOB request. Key details shown include Insurance Payor, Member ID, and Subscriber details. |
| History | This tab displays a log of the actions taken on the Phone VOB request. The logs can show when the request was assigned, when the VOB assessment was added, and any status changes. |
| Files | This tab presents the files that have been attached to the phone VOB request. Furthermore, users have the option to upload additional files to the request if necessary. |
| VOB History | This tab provides a display of the historical phone VOBs that have been conducted for the linked patient record. |
VOB 2.0
- Click on the CRM menu, hover your mouse over Verification of Benefits, then select VOB 2.0.
- Inside the VOB Queue, search for the client or click on Create Date to filter in ascending order by date creation to see the most recently created request.
- Once you have located your desired Phone VOB request, select the patient's name on the grid to begin processing.
- The focus panel will appear on the right side of your screen. Select the Assigned To field to choose an assignee for the phone VOB request.
- Select Assign to finalize the assignment.
-
Note: After selecting Assign, the record status will be automatically set to Assigned.
-
Note: After selecting Assign, the record status will be automatically set to Assigned.
- Next, select the Status field.
- Select Initiated and click Update to record your changes.
Note: Setting the Phone VOB request status to initiated will trigger the Time to Initiate counter to be recorded on the grid.
VOB Assessments
- Next, select the Add VOB assessment field, then choose Add VOB.
- Once added, the insurance form template will become available under the VOB assessments section. Additionally, users can see all pre-admission forms that have been worked on with the client within the Pre-admission Assessments section.
- Use the Notes field present on the Phone VOB focus panel to document any important details relating to the request. Select Update to populate the notes onto the VOB 2.0 grid.
- Once you're ready to fill out the VOB assessment form, select Answer.
-
The VOB assessment form will appear on the screen. Proceed to complete the assessment, and upon completion, select Save.
- Note: The VOB form will display an insurance header containing key insurance information related to the prospect/patient.
- Note: The VOB form will display an insurance header containing key insurance information related to the prospect/patient.
- Select Save and Close to record your responses.
-
Set the status of the Phone VOB request to Needs Approval and select Update.
- Note: Based on the scenario, set the phone vob request status accordingly. Users can select between Disputed or Waiting on Payor/Person.
- Note: Based on the scenario, set the phone vob request status accordingly. Users can select between Disputed or Waiting on Payor/Person.
- A VOB team manager will access VOB 2.0 and locate the request that is pending review. Upon locating the request, the user will select Answer to review the responses on the form.
- Upon completing your review, select the X icon to close the assessment.
- Select Print to capture a PDF copy of the completed VOB form. The PDF document will become available within the manage files area in the patient record.
- Select the status type and choose Closed Completed or Closed Incomplete depending on the outcome of the review. Additionally, select the applicable reason for the status by using the reason dropdown field.
- Lastly, select Update to close out the Phone VOB request.
- The Phone VOB request will then migrate to the Closed VOBs view in the VOB 2.0 queue.
Important: We recommend subscribing the VOB team users to any of the following email notifications to support your VOB 2.0 workflow:
- Notify when VOB Phone is Requested
- Notify when VOB assigned
- Notify when VOB Needs Approval
- VOB Closed or Delayed (All Users)
- VOB Closed or Delayed (Only Requestor)
For more information on the available email notifications, please click here.
Accessing Historical Records
Historical Phone VOB requests can be referenced within each corresponding patient record.
- Search for your desired patient by utilizing the global search bar.
-
Select your desired record to access, Select the phone VOB history section located on the left-hand side of the record.
-
This area will display all historical phone VOB requests that have been recorded for the patient.